
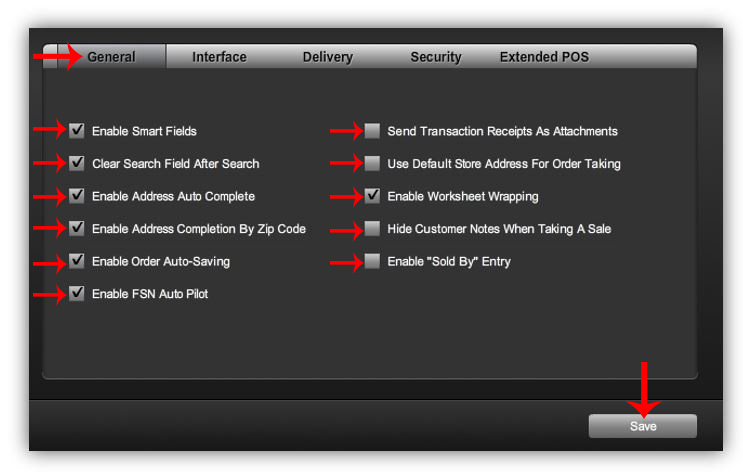
The General tab of the System Behavior Preferences window allows you to enable and disable general software functions.
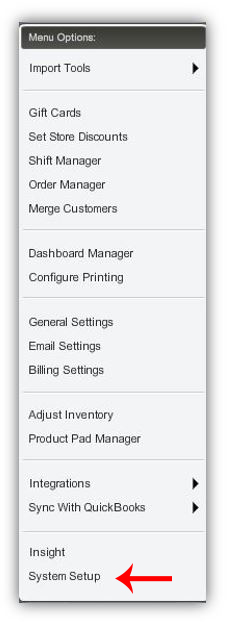
- First, click on the ADMIN icon
 on the top right corner of the POS screen.
 - Click the TOOLS button on the top LEFT side of the IRIS Administrator screen.

- Select, SYSTEM SETUP from the tools drop down menu.
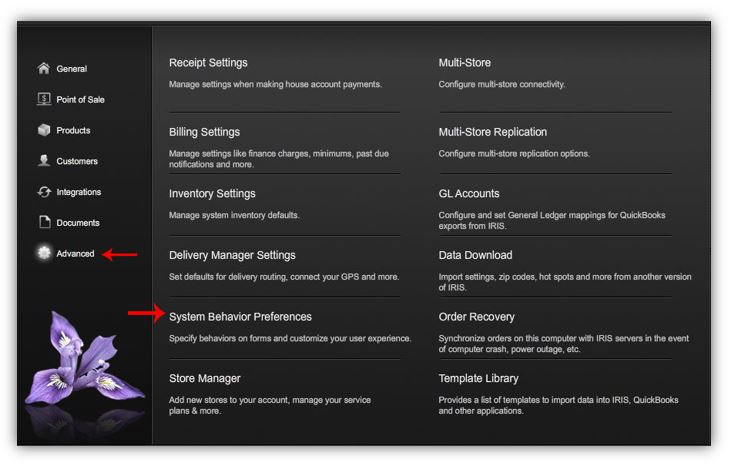
- Click ADVANCED on the LEFT side of the system set up screen.
- Select, SYSTEM BEHAVIOR PREFERENCES from the advanced page menu.
- Click on the GENERAL tab.
- You can choose to check (turn on) or uncheck (turn off) the listed options.
- Enable Smart Fields (this box is usually checked during set up.) Smart Fields automatically capitalize the first letter of each in each field. If it is unchecked, you will have to manually capitalize the first word in each field.
- Clear Search Field After Search (this box is usually checked during set up) When checked, the search field with automatically be cleared, when unchecked, you would have to manually delete the information in the search bar.
- Enable Address Auto Complete (this box is usually checked during set up) When checked, as you type in an address, similar address options will populate, you will then be able to choose an address from the populated list or continue to enter it manually.
- Enable Address Completion By Zip Code (this box is usually checked during set up) When checked, you are able to enter the zip code and a list of towns in that match the zip code will populate.
- Enable Order Auto-Saving (this box is usually checked during set up)
- Enable FSN Auto Pilot (when this is checked, all FSN orders will automatically be accepted)
- Send Transaction Receipts As Attachments (when this is checked, the receipt if emailed to the customer will be an attachment to the message)
- Use Default Store Address For Order Taking
- Enable Worksheet Wrapping (when this is checked, if the worksheet does not fit all on one page, it will be wrapped onto a second page)
- Hide Customer Notes When Taking A Sale (when this is checked, the employee will need to chick the show button to see the customer notes. when this is not checked, the customer's notes will be readily visible)
- Enable "Sold By" Entry (when this is checked, prior to sale completion, a window will pop up allowing the employee taking the order to select their name as the one who took the sale - this will be printed on the worksheet)
- When all desired functions have been checked, click the SAVE button in the bottom RIGHT corner.
Comments
0 comments
Please sign in to leave a comment.